Being able to start a fire, even in wet conditions is arguably one of the most important outdoor skills you could have. And if you ran out of cotton balls, it’s always nice to know that there are plenty of natural tinders to choose from. Also, there really is something quite unique about using the fire lightning techniques and materials that our ancestors used.
Here I’ve listed the best natural tinders in my opinion: birch bark, fatwood, feather sticks, coal fungi, tinder fungi, western red cedar bark, dead grass. After reading this article, you should be able to start a fire with just a spark from your ferro rod, regardless of weather conditions.
Birch Bark
The birch bark is one of my favourite natural tinders. It is really easily identifiable due to its white colour and horizontal strips, and will take a spark if processed fine enough without any long preparation.
It is also water resistant, and it contains flammable oils, so you’ll have an easy time starting fires even in wet weather.
Birch trees are commonly distributed among coniferous woodlands, typically on the northern, higher parts.
Gathering
To gather the bark, you will make a vertical cut along the tree with your knife. Then grab the bark and peel it on both sides of the cut.
It’s always better to use fallen trees for that, as they will be dryer and you’re not gonna damage them, but if you have no other choice the live trees will work just fine.
Just make sure not to peel the bark all around the tree as this is very harmfull and may actually kill it. After you get some stripes, you are ready to process it.
How to process the bark
There are generally two ways of processing birch bark that I’m aware of.
The first method is to just cut it into thin strips and then curl them up to make a tinder bundle. I personally don’t like this method very much, because it generally seems to wear down my ferrocerium rod more than the other method
The second method is to create birch bark dust, which is going to be really easily ignitable. To do that you first need to cut yourself a nice, square piece of bark.
Then, you use the back (or edge of your knife if you dont have a 90 degree angle) to process some fine dust from the white, front part of the bark. When you have a good pile, and you see that you are approaching the back of the bark stop and cover the dust with something, as it will only take a slight wind blow to spread it off.
Then make some stripes as in the first method, and then some bigger pieces. Now you can put the square piece with dust on something, and ignite it with your ferro rod. After the dust ignites, it will start burning the square sheath of bark beneath it. You can start adding the other pieces, which will also start to vigorously burn.
Fatwood
Every evergreen tree has resigns in it, and when there’s a dead branch, or a dead standing three, these resigns are going to fall back down and form something called fatwood in the base of those dead branches and stumps.
Basically, that is wood soaked in nice, flammable resign which can really easily be used to take a spark and make a fire.
How to gather the fatwood
So, you are in a coniferous forest looking for fatwood, where should you look? Well, that really depends on the tool that you have with you. If you have a folding say, you can consider big dead branches, if you’ve got nothing but your Victorinox pocket knife, you should scale down.
Regardless of the size, you should look for dead branches that are still attached to the tree. They are going to contain the most resign at the base, so grab your axe, saw or knife, and cut the branch as close to the stump of the tree as you can get it. If you see a rich almost red colour and can smell the resign, you’ve got yourself a piece of fatwood.
If you have a big saw or a felling axe, and you see a dead standing tree, you can even cut it at the base and you’re gonna find out that there is fatwood for days there.
Processing the fatwood
After you’ve cut your piece, if it’s a thick branch, you should batton it until you have pieces that are about 3-4 centimetres in diameter.
You can store those pieces in your tinder bag, put them in your survival kit, or drill a hole through them and wear them on your belt. I like to always have one or two of these with me when I’m out in the woods. When it’s time to light your fire, get your piece, and with the spine of your knife, start scraping fatwood dust and shavings.
The bigger the pile you make, the easier it is going to be to make that fire. After you’re done, put your ferrocerium rod in the middle, and being careful not to spill the fatwood everywhere, start scraping until the pile combusts into flames.
Feather sticks
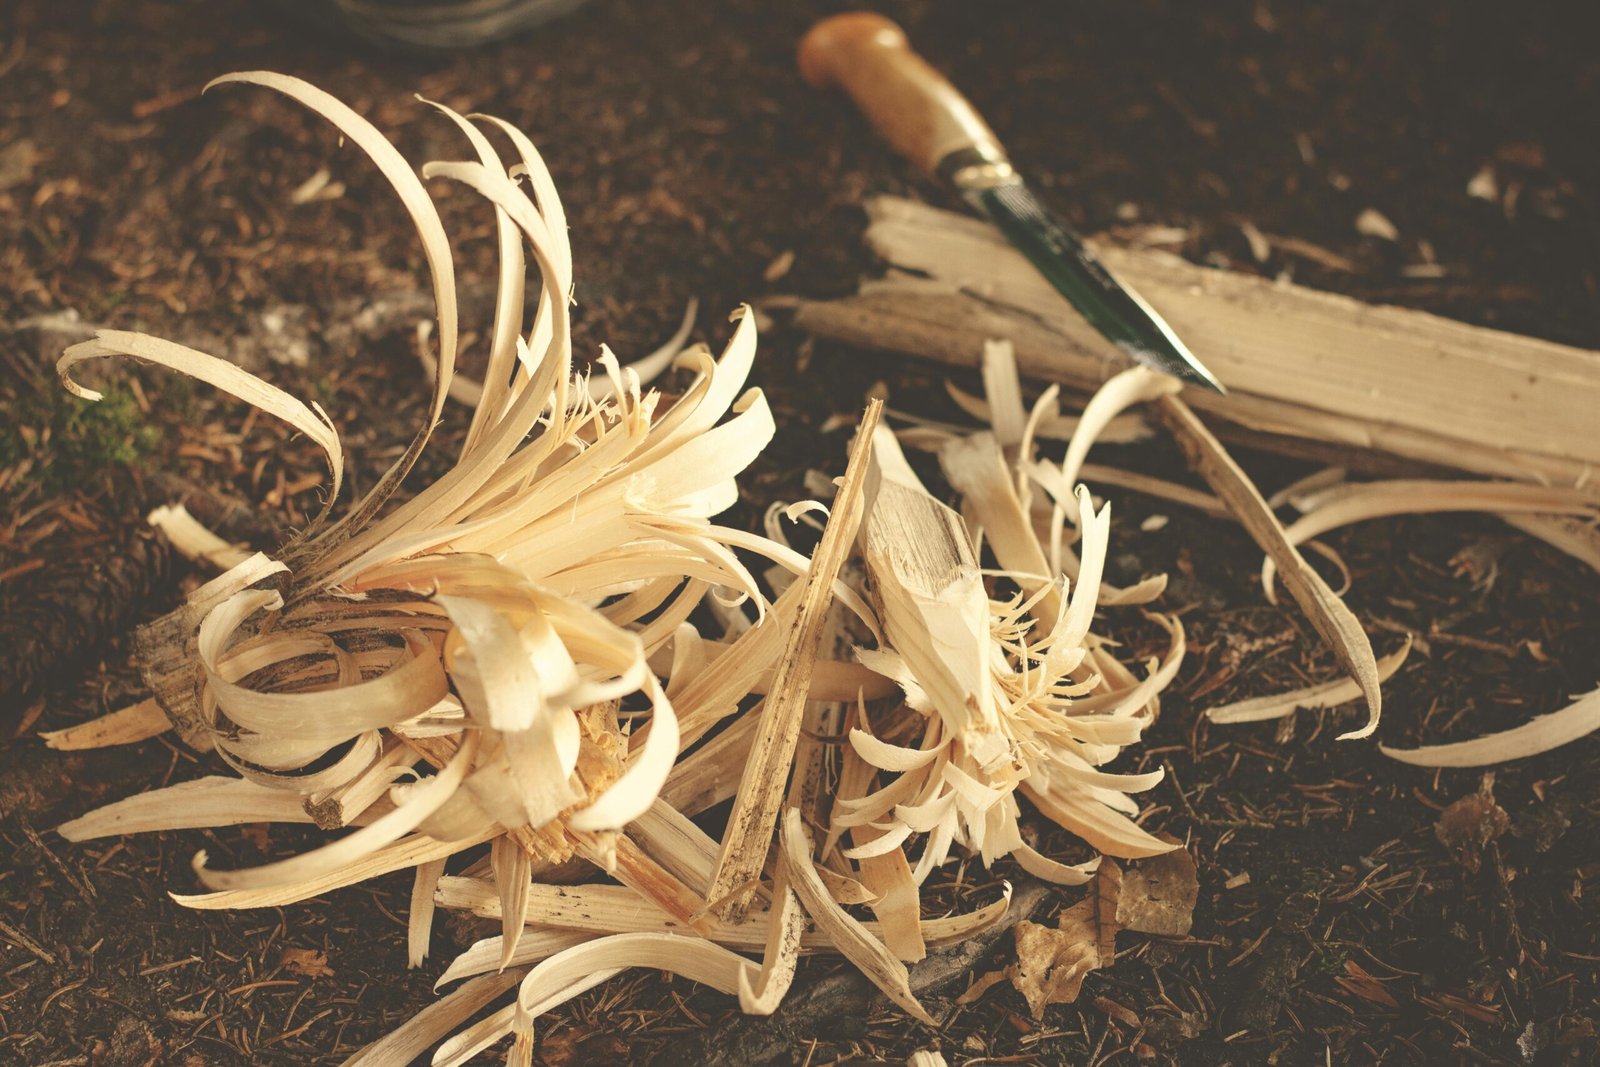
The feather sticks are a great option, because if it’s wet and you don’t have birch bark or fatwood around, you’ll have some wood at least.
And it is a really nice skill to use your tools to process a log far enough to be able to start a fire just with one piece of wood.
This is called the “one stick fire”
Gathering the wood
For feather sticks, just about any strait grained dry piece of wood will work. I’ve made feather sticks with pine, as well as oak and cedar. you just have to make sure it’s dry and it doesn’t have any knots.
Usually, the very inside of the log is the dryest and most suited for feather sticks. Also when choosing a tree don’t worry if you see that the outside is wet. Sometimes it can even be rotted and have a nice, dry core.
Processing the wood for feathersticking
So, you either start with a stick or a big log. When you are starting with a big log, first split it with your axe, and then use your knife to batton it further, you’re looking for pieces that are about 3cm wide. When you got those, you are ready to start feathering.
Hold the piece with your left arm and stake the other end firmly to the ground. Hold your knife in the right arm, put the base of your knife on the wood at a slight angle, and then gently push the blade down as you move to the tip of the knife. This should generate a nice, curly feather.
Don’t go all the way through, stop a little bit before the end so the feather doesn’t fly away. After that repeat, the process all around the piece of wood, except for the back side, until you can easily break it.
Igniting the feathersticks
To ignite the featherstick, lay it on its side on a flat rock or a wooden platform, then place your ferro rod on the stick part really close , but not in the feathers, and, being carefull, start scraping until you have fire.
Red Cedar
The Red cedar is a coniferous evergreen tree that is perfect for firestarting. It can be identified by the very distinctive orange bark and flat leaves. It has bark that can easily be fluffed up and used for tinder.
Collecting the bark
This process is going to be extremely simple – just get your knife and use the spine to shave off large chunks of it. After you’ve gather a handfull, which shouldn’t take really long, youre set to go and start your fire.
Processing the bark
To process the bark, just get it in your hands, and with a rubbing motion fluff it up. After a while all the different fibers should be pretty ceparated and fluffy. After that’s done you can put the end of your ferrocerium rod in the middle and shower it with sparks.
Coal Fungi
The Coal Fungi or Cramp Ball Fungi is very useful for fire lighting. It can be found on fallen ash trees, usually in huge colonies. It resembles a coal in appearance.
Gathering coal fungi
Generally, you should look for fallen ash trees. It looks like a bunch of black coals around the tree, you really can’t miss it if you’re looking for it. They spore at autumn, so then is when you’ll see them at all stages of growth and in all conditions
The new fungi. These are going to be the brownish very hard and moist mushrooms. they are not suitable for fire lighting. To check if the fungi is good, just tap it. If it seems very hard it’s probably not good. Then there is the rubbing – you can kind of feel if it’s good or it’s wet, can’t quite describe it, you’ll have to go and find out by yourself.
The last year fungi. this is what you’re looking for. Very rich black color, relatevly crunchy and soft to the touch. Dry. Intact shell. If there’s a crack in the shell that is probably going to mean that the moisture has had a chance to get inside, also some bugs can be using it for living space. So avoid cracks. try to find dry, crunchy, intact ones.
Another tip is if you are collecting this in any other season except autumn you should be carefull, as at that time of year the new fungi will already look black, but they are still not spored and they are not suitable. Just cut some open, otr knock on them to see if they are good.
If you find coal fungi in any place really, you should just memorize it and next year the population should still be there.
Preparing the coal fungi
When you’ve got you’rself the right type of fungi, just cut into it to reveal the inner structure. You wil find circles of growth, just like in a tree, each one represents a different year.
If there are more than two and it;s dry, that means you’ve got a good fungi.n Prop it up on something so that it doesn’t moove around, place your ferro rod on top of it, and shower it in sparks.
Once an ember forms, blow into it until it grows substancially. After that’s done, pop it into some dry grass or a different type of bird’s nest, and blow into it until you have fire.
Horse Hoof (Tinder) Fungi
The horse hoof fungi is a parasite mushroom, living on the side of many trees. It usually continues to live long after the tree has died.
It causes rot in the core. It’s a pretty good tinder if prepared properly. this is the only tinder on this list that is going to need some days worth of preparation and a bunch of processes around the camp, but I think the end result is worth it. It is also perfect if you want to start your fires the old school way – with a flint and steel.
Gathering the tinder fungi.
Once you spotted the large, hoof-like mushroom, you juct separate it from the tree using the knife to pry it out. It really shouldnt take a lot of effort. I usually go for larger ones, as the smaller kind isn’t worth the work for the amount of tinder that you’re going to get in my opinion. Gather a bunch of them
Preparing the horse hoof fungi
Now when you have at least 5 mushrooms, it’s time to prepare them. Cut them in half to see what you are working with. The bottom part of the mushrooms is where the spores are. That’s not what we are looking for. On top there is a brown material, leather coloured, feels a little bit like a cork.
That’s what we are trying to gather. And then there is the outer shell, which I would get rid of first. Using my knife, I carve out all of the hard shells to reveal the material below it. then, using my hands, I separate the spores.
Now I’m left with just the good material. Leave it in a pan of water to soak for an hour. then, bring it up for a boil and, while adding water, keep it boiling for at least an hour.
The longer the better. After that’s done, take out the fungi and put it down on a tree stump or a flat rock. Using the blunt side of your axe, or a stick, gently tap on the mushrooms. this will help get some water out, but most importantly it will separate the fibres.
Be carefull not to tap too agressively though, as you dont want to compress them so they don’t take a spark. After taht leave them to dry at home for two to three days.
After that’s done, you can finally use them for fire lighting. Get a piece, ruff up the top, and then shower with sparks. It should be efordless. You can also use it for flint and steel fire making and candles. It’s really a wonderfull tinder to have.
Dead Grass
Well, if you can’t find anything else, at least most of the time there is going to be dead grass around, right? Just take the grass heads and finer stuff, ruff them up a little, and shower them with sparks. It would shure shorten the life on your ferro rod, but in a pinch I’ve used it and it works.


